Limits and Targets
Set limits and targets to provide boundaries for planners.
Overview
Planning is about balancing constraints and objectives. For example, in the Headcount and Cost Planning model, planners often have to work within the budget set by the Finance team. In a Guided Diversity plan, planners may want to work towards diversity goals set by the Executive team. You can set limits and targets for plan items to ensure planners stay within constraints and align with objectives when entering plan values.
- Limits: Define the maximum values of a plan item that can be provided without exceeding budget, resource restrictions, or other constraints.
- Targets: Define the minimum values of a plan item that is required to meet objectives.
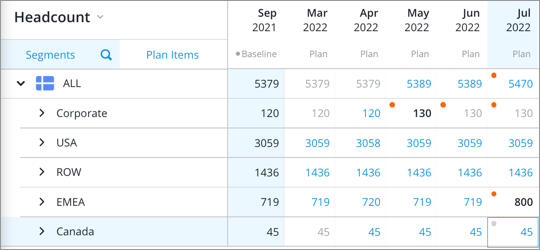
An orange dot in the upper-left corner of the cell will appear when a plan value exceeds the limit or falls below the target.
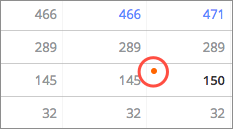
You can click the cell to find more information about the limit or target in the Info panel.
Note: Targets are not supported in the Headcount and Cost Planning (Classic) model.
Sync limit and target data to your plan
Limits and targets can be imported from overlay data. If you've provided Visier with limit or target data for the attributes in your plan, the plan model will automatically pull and populate these pre-aggregated values in the planning grid at plan creation and each time you update the baseline period of your plan.
Note: Sync limits to budget data for Headcount and Cost Planning
- If you're using the Headcount and Cost Planning (Classic) model, you'll have to manually sync the overlay data to limits. To sync your limits, click the Edit Configuration button
 in the upper-left corner of the planning grid. Then select the metric (budgeted or forecast) that you want to sync your limits to in the Sync limits to published budgets configuration area.
 - Once synced, the Headcount and Cost Planning (Classic) model will also automatically pull and populate pre-aggregated values each time the plan is rebaselined.
How limits and targets work in subplans
By default, if you create a subplan for a segment that contains limits or targets, subplanners will not be able to edit the limits or targets at the All level in the subplan.
For example, let's say you've entered values for the Upper limit on headcount in the parent plan for USA.
When you create and assign USA to a subplanner, the limit values at the this level will be locked. As a result, subplanners can only edit the values for the Upper limit on headcount in the subplan at lower levels such as USA Customer Support and USA Finance.

Note: Allow subplanners to edit upper limit on headcount
- You can choose to allow subplanners to edit the All level for Upper limit on headcount in their subplan in the Headcount and Cost Planning model.
-
To enable this feature, contact Visier Technical Support.
Set limits and targets
To set a limit or target in Segments view:
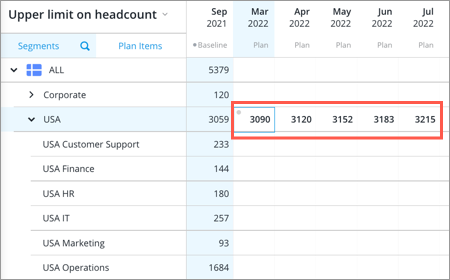
- Click the Context picker and select the limit or target plan item you want to edit. For example, in the Headcount and Cost Planning model, select the Upper limit on headcount plan item to set limits for the Headcount plan item.
-
In the planning grid, select the cell that you want to set a limit or target for and do one of the following:
- Type a value, and then press Enter.
- To use your plan values as a limit or target, right-click the cell, and then click Copy from planned values.
Tip: To set limits or targets for multiple periods, select a range of cells:
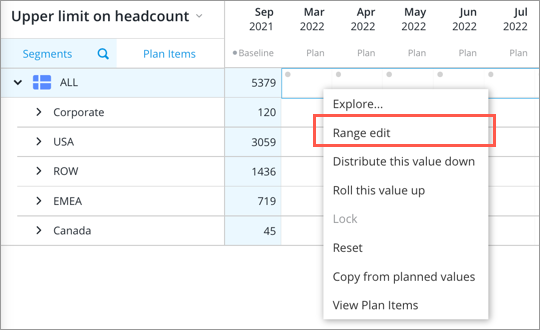
- On the In-context menu, click Range edit.
- In the Range Edit dialog, configure a series to determine how the cells will be filled.
- Click Apply.
To set a limit or target in Plan Items view:
- Click the Context picker and select the segment you want to set limits or targets for.
- Find the row for the limit or target plan item you want to edit. For example, in the Headcount and Cost Planning model, find the Upper limit on Headcount plan item to set limits for the Headcount plan item.
Limit plan items are indicated by this icon and target plan items are indicated by this icon
  .
. -
In the planning grid, select the cell that you want to set a limit or target for and do one of the following:
- Type a value, and then press Enter.
- To use your plan values as a limit or target, right-click the cell, and then click Copy from planned values.
Tip: To set limits or targets for multiple periods, select a range of cells:
- On the In-context menu, click Range edit.
- In the Range Edit dialog, configure a series to determine how the cells will be filled.
- Click Apply.
Example: Setting a limit on Headcount in the Headcount and Cost Planning model
Let's say you want to limit headcount growth to a maximum of two percent each period. To ensure subplanners are aware of this constraint when completing their subplans, you can set a limit for the Headcount plan item by entering values for the Upper limit on Headcount plan item.
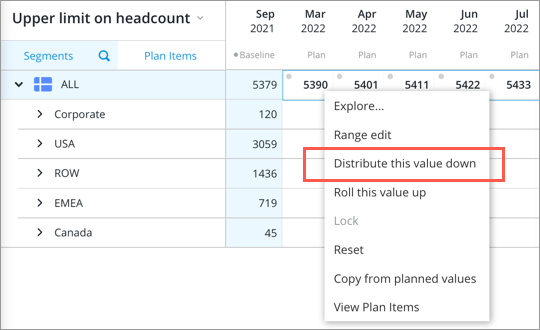
In Segment view, use the Context picker to display the Upper limit on headcount plan item in the planning grid. Select the cells at the All level and click Range edit on the In-context menu.
In the Range Edit dialog, select option 2 and configure the series as follows: Change the final range value by 2% of the previous period value and fill in the range using linear interpolation.
After you apply the series, the cells at the All level are filled with values. To set limits for the other levels of the plan based on the existing headcount ratios, select the cells at the All level and click Distribute this value down.
Planners will be notified in the planning grid when they enter values that exceed the corresponding limit that you've set for the Headcount plan item.